Layered papers, antiquing gel, and a treasured photograph provide a vintage appearance to this album cover.
What You Need:
* Photo album or scrapbook
* Newspapers
* White spray primer
* Textured lightweight papers, such as tissue paper,
in white, red, and blue
* Paintbrush
* Glossy decoupage medium
* Tracing paper
* Star pattern(s) in size desired
* Pencil
* Scissors
* Heavy textured ivory or white paper
* Photograph
* Cardboard
* Photo spray adhesive
* Brown antiquing gel
* Soft cloth
Instructions:
1. Remove the pages from the album. In a well-ventilated work area, lay the book flat, cover side up, on a newspaper-covered work surface. Spray the book with white primer. Let the paint dry.
2. Tear strips of red and blue paper into shapes.
3. Using a paintbrush, spread a generous amount of decoupage medium onto the book cover. Cover the book with white paper. Paint decoupage medium over the white paper. Layer blue paper strips in the upper left corner. Layer the red paper on the book, and paint decoupage medium over it. The papers should extend beyond the edges at least 1/2 inch. Let the decoupage medium dry.
4. Trace the stars onto tracing paper and cut them out. Trace around the large star once and the small star twice onto heavy textured paper. Cut out stars. Decoupage the stars on the cover.
5. For the cover photograph, use an original, photocopy, or computer-print of a photo. Trim the photo to the desired size. Spray the back of the photo with photo adhesive. Affix it to colored cardboard or heavy cardstock. Spray adhesive on the back to affix it to the album cover. Coat the surface of the photo album, including the photo, with decoupage medium.
6. Trim the paper around the edge of the book, allowing approximately 3/8 inch to extend beyond the edges. Fold the paper over the edge and decoupage it in place. Let the medium dry.
7. Paint a thin coat of antiquing gel over the surface of the album cover. Wipe gently with a damp cloth. Let the antiquing dry.
From homemadesimple.com
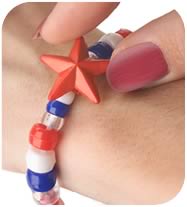
These easy-to-make red, white, and blue bracelets
are the perfect way to show your patriotism and have fun making a craft. They're even easy enough for kids to make, and you can wear yours proudly all year long!
Stars and Beads
Created by Maura Mackie
Materials (all available from most craft stores):
1 pack of satin cord
1 bag of colossal pony beads
1 pack of barrel clasps
Epoxy glue
Cut satin cord to fit around wrist with some extra for tying of clasps on both ends. On one end tie barrel clasp in a double knot. On the opposite end, begin to thread beads. Be sure to leave room.
Here are some great crafts to show your patriotism!
(Keep scrolling for your favorite!)
Assemble six standard-size pins by sliding beads on in this order: red, white, red, white, red, white, red, white, red for a total of nine beads on each of the six pins. You'll begin and end with red.
Assemble the final pin by sliding the red, white, and blue pins onto the large safety pin. Then slide on the remaining six red and white pins. To ensure that your beaded pins will not fall off of the big pin, spring the hinge on the big pin and slide the beaded pins around and place them on the other side of the hinge. It's almost like sliding a key onto a key chain.
Wear your American flag pin proudly.
at the end for the remaining barrel clasp. Once you have finished beading and the pattern is complete, tie the second half of the barrel clasp onto the cord and secure with a double knot. Finish each knot with a drop of glue to secure.
Note: We also used some plastic stars interspersed with the beads. Get creative!
After putting on a final spacer bead, thread a crimp and the other half of the clasp onto both strands of the tigertail. Send the ends of the tigertail back through the crimp and spacer bead. Hold onto the clasp as you pull the tigertail until taut (again, make sure clasp can move freely). Smash crimp, then trim extra tigertail close to the spacer bead with wire cutters or scissors.
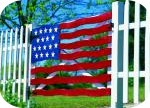
American Flag Gate
From HGTV.com
All it takes to create an all-American gate is a little elbow grease, the right tools and supplies, and the appropriate patriotic spirit.
Materials:
hammer
drill, with countersink bit and driver bits
Phillips- and flat-head screwdrivers
jigsaw
exterior high-gloss paint
paintbrushes and paint supplies
1"x3" pressure-treated boards (cut into two 3-foot, four 18-inch, and four 5-foot lengths)
1"x4" pressure-treated boards (cut into three 5-foot and four 3-foot lengths)
set of 8" gate hinges
gate latch
3/4" pressure-treated plywood
1" galvanized wood screws
1-1/2" galvanized wood screws
1-1/2" finish nails
wood putty
safety glasses
* The measurements for your gate will vary depending on the width of your gate opening.
* For a more polished look, countersink all pilot holes.
Assemble a rectangular frame consisting of two 5-foot 1" x 3" horizontal pieces and two 3-foot 1" x 3" vertical pieces. Set the horizontal pieces in place first; then lay the vertical pieces on top of them. Drill pilot holes, and secure the boards together with 1-inch wood screws.
Place a 5-foot 1x3 diagonally across the frame, drill pilot holes and secure it to the horizontal pieces using 1-inch wood screws.
Flip the frame over and place another 5-foot 1x3 diagonally across the frame so that the two diagonal 1x3s form an X. Drill pilot holes and secure the second diagonal board to the vertical pieces of the frame. Then secure the two diagonal boards to one another where they meet in the center.
Next, you'll need to build up the rear pieces of the frame to create a flat surface for attaching the 1" x 4" stripes. Flip the frame over again, and center two 18-inch 1x3s over the horizontal pieces. Drill pilot holes and attach them with screws.
Then build up the rear diagonal piece by placing two 18-inch 1x3s over it on either side of the front diagonal piece. Drill pilot holes and secure the two boards to the rear piece with screws.
When the frame is assembled, fill all of the pilot holes with wood putty. Paint the frame white and allow it to dry.
To create the stripes, use a jigsaw to cut wavy edges on one of the 5-foot 1x4s . Use that board as a template for cutting out the rest of your stripes. Paint each board red.
To create the background for the stars, use a jigsaw to cut out a 24" x 19" piece of plywood. Cut a wavy edge on the bottom of the plywood so that it matches the stripes. Paint the plywood blue and allow it to dry.
Paint white stars on the plywood. You may want to use a template.
Attach the plywood to the upper left corner of the frame with 1-1/2-inch wood screws.
Dry-fit the stripes so that they are evenly spaced. Drill pilot holes and secure them to the frame with screws. Because the second and third stripes won't have adequate support, you'll need to toenail them to the plywood with finish nails or wood screws.
Fill all holes with wood putty, and touch up with paint as necessary.
Finally, attach the gate hinges and latch, and secure the gate to your fence posts.
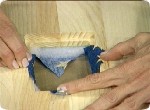
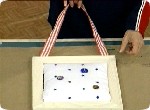
Padded Center
Cut a piece of foam core board and batting the same size as the inside of the frame. Place batting on top of foam core.
Place batting and foam core face down onto the fabric. Tape the fabric to the back of the foam core.
Attach to inside of frame with glue. Decorate with pins or buttons.
To hang the frame, staple a piece of ribbon on the back on the two upper corners (figure B).
Figure A
Figure B
Figure A
Figure B
Figure C
Figure D
Figure E
Figure A
Figure B
Candy Flag
From BHG.com
Salute the flag with this easy, yummy project.
What You Need:
* Sheet of typing paper
* Pencil
* Tape
* Waxed paper
* Cookie sheet
* Almond bark (four squares)
* Resealable plastic bag and scissors
* Red and blue cake-decorating sprinkles
Instructions:
1. Draw a stars-and-stripes flag design on a sheet of typing paper. Cover your design with a piece of waxed paper, and tape both pieces to a cookie sheet.
2. Melt the almond bark as directed on the package. Spoon the melted candy into a plastic bag, and cut a small hole in one corner of the bag.
3. Pipe the candy over the stars and stripes in your design. Before it hardens, add blue sprinkles to the stars and red sprinkles to some of the stripes.
Old Glory Slate
From BHG.com
This painted version of the Stars and Stripes comes already framed, since a slate is used as the artwork's "canvas."
What You Need:
* One purchased slate
* Sandpaper
* Crafts glue
* Wood stain
* Mod Podge
* Clean, soft rags
* Black fine-tip permanent calligraphy marker
* Black fine-tip permanent-ink marker
* Scrap wood for practicing
* Sharp pencil; ruler
* FolkArt acrylics paints: PR Poppy red (630), BB Brilliant Blue (641), WW Warm White (649), SP Strawberry Parfait (751), and CR Calico Red (932)
* Four 5/8-inch-diameter gold buttons with eagle design
* Wire cutters
* Jute or florist's wire (hanger)
Instructions:
1. The writing surface of our slate measures 7 x 10 inches. If your slate varies in size, adjust the width and height of your stripes to allow for seven horizontal and five vertical equally spaced rows.
2. Sand the frame, wiping away dust with a soft cloth. Use a cloth to apply wood stain to frame. To prevent the calligraphy marker from bleeding into wood when inscribing phrases, seal frame with two coats of Mod Podge following manufacturer's instructions.
3. Practice writing patriotic phrases on scrap wood using the calligraphy marker. When satisfied, inscribe a phrase centered on each side of the wooden frame.
4. Use a pencil to lightly draw a 4 x 4-inch square in upper left-hand corner of slate. Use a sponge brush to basecoat the square BB, applying three coats to achieve a deep color. Basecoat the remainder of slate WW, applying at least three coats for complete coverage.
5. With pencil, divide white area into 1 x 2-inch rectangles. Divide white area into 1 x 1-inch squares for stars.
6. Use the flat brush to paint the red rectangles PR. Use the shader brush to shade the top of each red block with CR. To shade, dip brush in water; blot excess on a paper towel. Dip one corner of the brush into the paint. Blend paint by stroking brush on palette until color gradually fades to the opposite side of brush. Place paint side of the brush along the top of each block, stroke across the block to shade. Highlight the bottom of each red block with SP, using the same method as above for shading, placing the lightest color at bottom of block.
7. Highlight each 4-inch side of the blue square with WW. To define mini squares, use liner brush to paint white lines over pencil lines. With pencil, draw stars freehand. Thin WW with water; paint stars using No. 2 round brush. Let dry.
8. Using the permanent-ink marker, draw dash "stitch" lines between red and white rectangles. Draw stitch lines around stars and along the blue squares. Make an X at each corner of blue squares.
9. Seal painted flag and wooden frame with water-based varnish following the manufacturer's instructions. Use wire cutters to cut shanks off buttons. Glue buttons to each corner of frame. For hanger, knot end of jute; make a second knot 2-1/2 inches away; trim beyond second knot. Center jute on upper back of slate; glue knots to board.
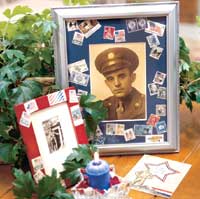
Freedom Frames
From the book, Celebrate the Red, White & Blue
Patriotic postage stamps add personality and
history to purchased mats and frames.
What You Need:
* New or cancelled postage stamps (not self-stick,
available in crafts stores and hobby shops)
* Frame or picture mat
* Decoupage medium
* Paintbrush
Instructions:
1. If necessary, remove paper backing from the stamps.
2. Arrange the stamps on a picture frame or mat. Using a paintbrush, apply decoupage medium to the back of each stamp. Glue the stamps on the mat or picture frame until a desired look is achieved. Let the glue dry.
.
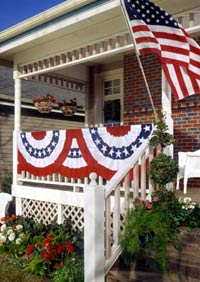
Patriotic Swags
From the magazine, Crafts and Decorating Showcase
Decorate your house with swags and bunting to show your support for America.
Trim your house with bunting -- which is so easy to create that you'll be amazed. Patriotic borders and flag motifs come in a variety of sizes. These are sold by the yard, so just choose a design in the scale that best fits your project.
Instructions:
1. Measure and cut the amount you need, cut away excess fabric along the scalloped edge, and finish the edge by serging it (or sew a row of staystitching along the edge.)
2. Hang the fabric from your porch railing, along the roofline, or under each window, attaching it with thumbtacks or duct tape. Printed fabric is realistically shaded and it will look as though draped bunting is fluttering in the wind, even when the yardage is tightly stretched.
From homemadesimple.com
This patriotic American flag project is the perfect
craft for kids and adults. It's easy, inexpensive,
and a great way to show off your national pride.
You and the kids can do it together and have the
opportunity to discuss national events or simply
enjoy each other's company.
Materials
1 large safety pin (1-1/2 inches)
13 standard-size safety pins (1 inch)
Red (44), white (38), and blue (35) beads
Assemble seven standard-size safety pins by
sliding five blue beads and then a white bead,
then a red, then white, then red onto the open pin.
Be careful not to stick yourself.
Red, White, and Blue Forever
Created by Sarah and Sue Kramer
Materials (all available from most craft stores):
1 clasp (twist or lobster-claw type)
2 crimps
24 inches tigertail (similar to fishing wire)
Gold spacer beads
Red, white, and blue seed beads
Wire cutters or scissors (could also use fingernail clippers)
Needle-nosed pliers
Thread crimp and one half of the clasp onto the tigertail. Put one end of tigertail back through the crimp and center the clasp. Leave a little space for the clasp to move freely, then smash crimp with pliers.
Thread a gold spacer bead on one side of tigertail, and then send the other end through bead in opposite direction. Pull on each end evenly until bead is as close to crimp as possible.
String nine seed beads (in red, white, and blue pattern) onto each side, then repeat step 3 with another gold spacer bead. Repeat steps until bracelet is long enough. Stop with a completed oval.
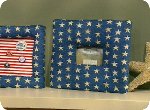
Patriotic Padded Frames
From HGTV.com
Turn wooden frames into terrific nautical themed padded frames using red, white and blue themed fabrics, ribbons and batting. These frames are great for a collection of antique boat or ship pictures, photos of fourth of July family outings, or for a collection of patriotic memoribilia.
Materials:
unfinished frame
batting
fabric
staple gun
tape
foam core board
ribbon
Steps:
Padded Frame
Cut batting the same size as the unfinished frame, leaving a hole in the middle.
Place batting on top of frame and place face down onto the fabric.
Cut the fabric from the center to all four corners (figure A). Pull the fabric through the hole and staple onto the back of the frame.
Pull each side and corner up and over the back of the frame and staple (work on opposite sides).
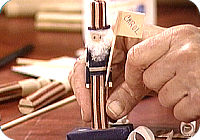
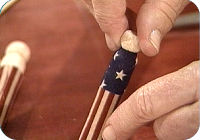
Clothespin Uncle Sam
From HGTV.com
Materials:
old-fashioned wooden clothespin (figure A)
scissors
fabrics with patriotic colors and designs (figures B and C)
wooden skewers
cardboard
flesh-colored construction paper
glue
pen
cotton ball
foam tray
tooth pick
cardboard tube
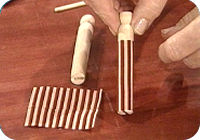
1. To make the trousers, cut a piece of fabric so that it measures half the length of the clothespin and is slightly wider than its circumference. Wrap the fabric around the lower part of the clothespin (figure D), and use a skewer to tuck the vertical sides of the fabric in the front opening of the clothespin.
2. Cut a different piece of fabric, and wrap it around the clothespin to make the shirt (figure E).
3. Cut a small piece of fabric and fold it into a 1/4-inch strip. Glue it around the clothespin between the shirt material and the trouser material to hide the seam between the two.
4. Cut two small pieces off a skewer, and wrap them with the same fabric used to make the shirt. Glue the pieces onto the clothespin to make the arms.
5. Cover a small circle of cardboard with fabric to make the brim of Uncle Sam's hat.
6. Roll up a strip of paper and cover it with fabric to make the top of the hat, and attach it to the fabric-covered "brim."
7. Glue wisps of cotton around Uncle Sam's "head" to make hair and a beard, and then attach the hat.
8. Use the pen to draw two small eyes on the top, rounded part of the clothespin.
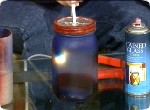
Patriotic Lights
From HGTV.com
Here are some quick and easy ideas for Independence Day decor any time of the year:
For a homemade light, remove the top from an empty Mason jar. Punch a hole in the middle of the top with a nail. Cut a slit to the outside using tin snips. Run a single light that comes with a switch (available at craft stores) through the top. Cover the remainder of the top with foil, if desired. Color the glass part of the jar with red and blue stained-glass spray paint and white frosted paint (figure A).
Spray-paint a cylinder with stained glass and frosted paint, pour sand in the bottom and place a candle inside. Place sparklers inside another cylinder painted in the same manner for a fast table decoration (figure B).
9. To make a base for Uncle Sam to stand on, cut two, 1" x 1" squares out of the foam tray, and glue them on top of each other. Cover the pieces with fabric, and attach them to the bottom of the clothespin.
10. Make a "flag" out of a piece of paper glued to a toothpick.
11. If desired, write a guest's name on the paper, attach the flag to one of the arms, and use the figure as a decorative place card.